Showing posts with label planner set up. Show all posts

Tuesday, 2 January 2018

Wild Hare Kits: January 2018 Kit Reveal

Hello! Hello! It's my favourite day of the month, because it's kit reveal day at The Wild Hare Kits! And what could be more exciting than my first kit of the New Year? 


Want a little scrapbooking kick to start the New Year? Then fill out a Wild Hare Kit Style Profile. and order a kit that's curated with care. There's no monthly commitment, so it won't hurt to try!

Saturday, 19 March 2016

Kitted Out!

Recently, I shared some tips and techniques for Creating DIY Planner Kits From Your Own Stash, with Amy and Jenn over at the Planner Squad. Over the last week, I've finally had the time to sit down and make something with the kit that I created and I am thrilled with the results. Want to see?

The base for the kit was a small ring-binder, which came with some standard (rather boring dividers) which I replaced using some of the bright, colourful cardstock that I had in my kit. You'll notice that I didn't add tabs, as I like to move my dividers around when I'm bored! Normally, I'll use clips on the tops or sides of my dividers as 'bookmarks' instead. 


I've added some cute notes to the dividers/dashboards - and the front pocket is the perfect size for a small set of alpha stickers, die-cuts and a few additional embellishments.


The binder is perfectly sized to hold a set of lined notecards, so after punching them all to fit, I decorated about a third of them using the craft tapes, stickers, tags and stamps from my kit. I love including a wide selection of embellishments when I make mini-albums, because I love how wonderfully fat these little beauties become when full!


This beautiful, button clip is easily my favourite item from the kit (the chevron washi from DoCrafts is a very, very close second) because it's stunning! I bought it at a local haberdashery such a long time ago, but wasn't sure how to use it. It looks so lush in the binder - and I'm thrilled to have found the perfect spot for it! 


I'll be using the rest of the kit to decorate the remaining notecards, but I think I'll also end up using some of it for cards (it's such a bright, happy mix of colours!) So, I've stored some of the more substantial cardstock and embellishments in the little binders that I use for 'Keeping Kits' and there's a small selection in the binder, to use 'as and when'. 

I'm really looking forward to using the binder - and am wondering whether I might use it as the basis for a small mini-album all about my planning obsession! Watch this space! 

Monday, 14 March 2016

Shaker Style Planner Dashboard

Combining this month's Counterfeit Kit with some of the leftovers from January's Planning For Perfection Kit (truly the kit that will never die) I have, somewhat semi-successfully, made my first 'shaker-style' dashboard for my A5 Filofax. 


I found a Project-Life folder, trimmed it to size and then added a cute, little card before stitching it to hold it central. Once the central card was stitched, I threw in some sequins and 'confetti' that I made from kit leftovers, before stitching the inside edge. I then added a little cardstock to hide the edging and support the binding. 

It's not as neat as I would like it to be but I still think it's cute and, of course, I know that we are our own worst critics! 

Saturday, 12 March 2016

Keeping Kits {Plan With Me}

Over the last few weeks, the team at the Counterfeit Kit Challenge have been sharing some of their most Stylish Scrapbook Storage. Having talked a lot recently about Creating Kits, I thought that it might also be worthwhile to talk about how I keep them!

I'll usually have two or three Counterfeit Kits in use during the month (using the current kit and working ahead on projects for the next reveal.) When I was working with substantially smaller kits, this worked well. I could 'kill a kit' successfully, then move a new kit into the box I had been using to store it all.


However, at the end of January, I still had a box full of lovely, luscious product from the Planning For Perfection Kit and, having created a kit that continues to inspire me, I didn't want to break it down and 're-home' it all with the rest of my stash.

I was also still working with my kit for Document December (in fact, I am *still* working with my kit for Document December) but, it was nearly time to start working with a new kit for February. I desperately needed a storage solution that would allow me to keep all of the lovely leftovers from each kit in one space before I became overwhelmed with boxes, envelopes and dishes full of kit leftovers!


Eventually, I found the Wilko A5 Binder, a frosted/clear binder, which comes with a small exercise book, five dividers and four 'ziplock style' envelopes. Once full, four envelopes are perfect for the size of the binder, so I removed the exercise book and dividers and I'll no doubt use them in another project sometime soon.


 I needed two envelopes for the leftovers from the Planning For Perfection Kit!

The clear envelopes make it really easy to find the kit that I want to work with and their 'ziplock' style keeps everything secure. The size of the binder also means that it's easy to store in my craft room and, as a bonus, is easily transported to my local scrapbooking club. I love taking my kits with me - it makes it so much easier to plan and pack!

I am thrilled to have found a solution that works and have, obviously, been back to buy a few more of these little lovelies! I can't wait to see them fill up with lots of little leftovers!

Head on over to the Counterfeit Kit Challenge to see more Stylish Scrapbook Storage solutions that work for the team!

Wednesday, 17 February 2016

Transferring Designs {What's On Your Workdesk Wednesday #350}

So, before I start 'showing off' what's on my workdesk this week, I wanted to say a massive thank you to everyone that visited for What's On Your Workdesk Wednesday #348 and apologise, profusely, for not returning the favour! I went to work that morning 'full of the joys of spring' and by mid-afternoon was 'full of cold' instead. I've spent the last couple of weeks in bed, with a temperature - and boxes and boxes of tissues! I swear that I'll make it up to you all somehow! :)

Now, onwards. Thanks to the 'treasure' that is scheduling, I shared the details of my lovely 'new to me' binder with everyone over the weekend and, now that I'm feeling a little better, I have actually been able to start using it. Oh, the simple pleasure of using something once it's been made!


I'm intending to use it to house all of the paperwork associated with running my own little etsy store - including receipts, tax returns, etc - and I'm slowly, slowly transferring over some of the stacks of loose paperwork that have been cluttering up the craft room. 


Last night, I sat down to start transferring in some of my sketches, 'how to' notes and completed tutorials - a lot more fun than transferring in receipts - and came across at least three or four designs that I had completely forgotten about! Along with the sketches/notes for some that I keep meaning to attempt, like that necklace design in the photograph above. I'm not sure if it's easy to see, but it will eventually include a beaded bow! 

Visit Stamping Ground for more information on What's On Your Workdesk Wednesday.

Saturday, 13 February 2016

The Rescue Planner {Plan With Me}

Is it me or was that a really, really long week? I'm looking forward to a chilled out weekend - especially after spending last weekend clearing out some of the 'hoard' in the fella's conservatory. It was hard work, but hard work is it's own reward, right? Um. Yeah ... but so is finding an A5 Filofax in a corner!

Unloved and unwanted, I knew that I could offer this little lovely a new home, where, after a little love and attention, it would shine! This is 'The Rescue Planner'.


After a little clean and a bit of a buff with some leather restorer, the cover looks a lot better, though there are of course a few scars that will never heal :)

But, it's the heart of the planner that shows it's true beauty and I've been using the 'Planning For Perfection Kit' (the Counterfeit Kit that never seems to end) to start setting it up, as the only inserts left inside were from 2005 and they were more than a little bit musty! 


I had plenty of cardstock leftover from working with the kit in January, so I used the 12x12 sheets to create new dividers. Of course the beauty of working with a counterfeited kit is that all of the colours and details work well with each other, even when both sides of the cardstock are on show!


With some of the cardstock off-cuts I made a couple of additional pockets, adding a little bit of washi tape from the kit to the edges where I had stitched the sides for strength.


The Dear Lizzy Collection contained a handful of sheets that could be cut down to create a small selection of lists, sentiments and little embellishments and there's still a lot for me to use - and I'm keeping them on hand in a small, clear envelope to decorate the spreads in the planner, once I start using it.


Lastly, I added some cute little note-cards that I die-cut from the Dear Lizzy Collection. One of my favourites - with the words 'Courage, Magic, Making' is decorating the divider at the very front of the binder and I've stashed a few more away in the front pockets!


Believe it or not, because I was working with a kit, it only took two hours from start to finish (including buffing up this baby) to set it up and make it not only functional, but pretty too! 

What's the best thing that you've come across while having a clear out?

Saturday, 30 January 2016

Planning For Health & Fitness {Plan With Me)

Today, I wanted to talk a little bit about how I'm 'Planning for Health & Fitness'. I'm happily 'on the mend' from a series of illnesses and injuries and, am working towards some of my own health and fitness aims - rehabilitate shoulder, back and ankle following injury; eat more healthily to avoid illness; combat stress with exercise and run some races!

Coming back from illness or injury can be hard work, especially if you are more than aware of new limitations. It can be difficult to 'hold back' from working too hard, trying to reach the speed, distance, or euphoria of old times - and causing new issues!

So, to force myself to take things more slowly in the lead up to my first race, I'm working from a set schedule. You can see that I've trimmed the schedule down to fit in the Color Crush, simply folding it to the same width as the main inserts. I'm referring to the schedule each time I run, because it includes useful information about the speeds, distances or times that I should be running. 


I've also included each scheduled session in my calendar section - and I won't move them if I can avoid it, no matter how enticing the invitation! It's functional, rather than decorative at the moment, but I have my eye on the ridiculously cute Plan Fitness Stamps from The Sweet Stamp Shop. It would be perfect for my current mix of running, weights, walking, swimming and hot yoga! (I know that I don't *need* them, but I am considering them as a reward for completing my first month of training!)


Once I've completed a session, I'll tick it off on the schedule and in the calendar (for double satisfaction) and will include some brief notes on the session. I'm currently writing my session notes on Filofax 'Coloured Note Paper', but as I'm constantly writing out the same information (date, time, distance, speed, etc) I'm on the lookout for some fitness specific inserts. I might even consider making my own if I can't find something suitable!

I know that many of the people visiting have been considering their own set-up (or have been considering buying their first planner!) so if there's something specific that you would love to see me cover in the Plan With Me series, let me know!

Saturday, 23 January 2016

One Binder To Bind Them All {Plan With Me}

I've received so many questions recently (via the blog and social media) about my new Color Crush Planner and how I intend to use it. So, I'm starting a new 'Plan With Me' series this morning - and each week, I'll be sharing ideas and tutorials for customising (and more importantly, utilising) your planner.

Whilst I am new to the 'Planning Community' I have never, ever been without a hard-copy diary (or, more recently, my little Filofax) and a stack of lists, usually scattered around my work space and on the backs of envelopes; in small notebooks and written into the corners of magazines!


Although I, usually, like to think that I'm organised I know that hunting down a list that's been lost in a stack of paperwork is counterproductive - as is procrastinating by writing another one! I am hopeful that, having 'one binder to bind them all 'will help me to remain focused on the task at hand!

I have a feeling that working out what to have where will be an ever-evolving process, but that's exactly why I love working in a binder system. It's changeable and that's absolutely wonderful for someone who becomes bored very easily.

In the meantime, I thought I would start with an overview of my set-up and then, over time, show the sections in a little more detail.

Inside Cover/Front Dashboard - 

For the moment, the left-hand side of the inside cover is housing the sticker sheet that came with the Color Crush, a couple of cute journalling cards from Sodalicious (sadly, the store has now closed) and some of the little Planner Clips that made with this month's Counterfeit Kit 'Planning For Perfection'. (I've been using the kit - almost exclusively - to set up this month.)


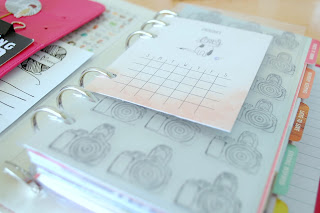
On the right-hand side, there's a customised dashboard (see my Stamped Planner Dashboard Tutorial) over-laying the first of the Color Crush sections 'Write It Down'. I've added a cute calendar card using the Amy Tan 'Stitched Felted Paper' that I had in my kit.


Isn't it beautiful? I love the fact that each little calendar is customisable. That's going to bring me a lot of happiness throughout 2016!

I'm keeping all of my lists in the 'Lists To Love' section. So far, I have a mix of inserts in there - Websters Pages 'Lists To Love', Filofax 'Coloured Note Paper' and some customised lists from the Dear Lizzy Serendipity Collection.


This is the section that I am currently using the most often (in fact, I haven't really been using the other standard sections) so I'll definitely be back to show this one off in more depth and will be mulling over options for each of the other sections 'Write It Down' 'Memory Keeping' and 'Staying Inspired'.

Calendar -

Having transferred from my trusted (but old and battered Filofax) I'm currently using my 'Academic Diary - Week On Two Pages' rather than the inserts which came with the Color Crush. This is the 'Calendar Overview' and I've added a small Stick On Gem for the birthday of each member of my family. I love the way it sparkles in the sunshine!


Having been adamant that I wouldn't start decorating the calendar section, I must confess that I've had a complete change of heart. It's so much fun - and it makes checking off exercise sessions and chores that much more cheerful!


I'm slowly, but surely, starting to work out how to customise my planner to suit my own needs so I hope you'll come back to visit as I share the progress! x

Saturday, 16 January 2016

Stamped Planner Dashboard Tutorial {Counterfeit Challenge: January Challenge #3}

For January Challenge #3 at the Counterfeit Kit Challenge we are using repetitive stamping designs to create some interest in our designs (and, of course, to dust off some of those much neglected stamps!)

This month I've been busy using my Planning For Perfection Kit to personalise my Color Crush Planner and decided to add a customised dashboard to the front of my planner - as a way of reminding myself to take more photographs!

Adding a customised dashboard or divider is one of the simplest ways you can put your own stamp on a new planner (Oh my. Do you see what I did there? I am hysterical!) but it can be difficult to create a repeated design, even with a clear stamp, simply because it's difficult to keep the image well positioned.

Over time, I've tested some simple methods and have found one which works for me, even when I'm using block mounted stamps. My results are, of course, never perfect but I'm usually happy with them. And that's what counts, right?


You'll Need:

Acetate (transparency or clear dashboard)
Stazon Ink (or a similar, alcohol based ink)
Stamp(s)
Paper/Cardstock
Pencil
Ruler
Eraser
Single Hole Punch
Planner Clips

1. Choose a stamp set that looks awesome. Mine is the Selfie Stamp Set from Wilkinsons. (They outdid themselves on this cute stationary range. There are some really cute designs!)
2. Measure the mount block (not the stamped image) and, onto a clean sheet of paper, mark out the measurements. Ensure that the 'blocks' created fit within the lines.


3. Layer the acetate onto the paper sheet and ensure that it will not slide around whilst stamping, by adding a couple of clips to the sides, top or bottom.


4. Add ink to the stamp and stamp directly onto the acetate using the lines to position the stamp correctly. To ensure minimal smudging, right-handers should start in the top left-hand corner and work from left to right, moving downwards, to ensure minimal smudging. Left-handers may want to start in the top-right!


5. Leave the ink to air-dry for at least half an hour (to avoid smudging.) Once the ink is dry, remove the clips. You might need to fill in some blank spaces, if they were occupied by the clips!


6. Add holes to the acetate using a pre-punched divider/planner page as a template. Add to binder and then stand back and admire. 

Extra Tips & Techniques - 

1. To add stamped images to patterned papers and cardstocks (e.g. non-transparencies) draw the measured lines in very faintly with a pencil, then erase with a soft, smooth touch.

2. Repeated patterns look amazing with coloured inks, so try a mixed up look!

3. Practise stamping skills on transparency saved from old packaging before unleashing creativity on special projects.

4. You can re-use the measured lines with other stamps by choosing where to position them within the lines. (e.g. line up smaller stamps along the bottom-left lines.)

I'm slowly, but surely, starting to work out how to customise my planner to suit my own needs and - each Saturday - will be sharing more ideas and tutorials. I hope you'll come back to visit! In the meantime, make sure that you visit the Counterfeit Kit Challenge, where Leslie and Margie are sharing thier own takes on the challenge!

Wednesday, 6 January 2016

Color Crush {What's On Your Workdesk Wednesday #344}

So, I came across What's On Your Workdesk Wednesday a little while back and decided that, in the New Year, I would join in by sharing some of the projects that I've been working on in my own little creative corner of the world. 

This week, I've been busy setting up my new Color Crush Planner, as I am hoping to make it as useful (and fun) to use as I can!

I made these dinky little planner style clips using some of the stash in January's Counterfeit Kit. Aren't they cute? If only I could think of a way to make my tax return as much fun!


Before I start work on that horror of horrors, I'm off to visit Stamping Ground for more What's On Your Workdesk Wednesday - I'm really looking forward to sneaking a peek at some new work spaces!

Friday, 1 January 2016

Planning For Perfection! {January's Counterfeit Kit Reveal & Blog Hop}

Hello & Happy New Year! What better way to celebrate the beginning of a fresh, new year than with a brand new kit to counterfeit from the Counterfeit Kit Challenge?

Your inspiration this month is a choice of the fabulous kits from the Planner Society Kit Club by Scarlet Lime and, if you've been following the Counterfeit Kit Challenge reveal blog hop (which starts on the main blog) you will have arrived from Susanne at Snaps And Snippets, and will already have seen lots of amazing kits! (I can't wait to have a look at them all!)


I had ordered a rather lovely Color Crush Planner in Dark Pink, from Webster's Pages (which has now arrived!) so decided to work with the September Planner Society Kit which contained a small sized portfolio in a similar colour and a whole host of co-ordinating loveliness!


I started with the inclusion of some beautiful papers from American Crafts, Dear Lizzy, Sodalicious and Elle's Studio. The 'A' sides are mainly Black and Grey, but I have a little touch of Hot Pink, Yellow and Aqua - and the 'B' sides are a riot of colour, so  I should have a lot of choice. I also included a 6x6 stack from Dear Lizzy's Serendipity Collection (which is a fairly recent addition to my stash) because it's delightful. And I couldn't resist :)


Also in my main kit are some Thicker Sentiments, some smaller alphas from Sodalicious, an Amy Tangerine Stamp Set, pocket cards, binder clips and a circle punch. I've included a beautiful calendar from Blooming Homestead which, I thought, perfectly combined the colours and florals from the inspiration kit. I've printed two months on each page, so that the calendar will be A5 sized. It will be the perfect addition to my desk in 2016!


There's usually only a small selection of 'chunky' embellishments in the Planner Society Kits (as too much bulk isn't ideal in a diary) and this is fine with me! I'm the Queen of Restraint when it comes to choosing a small selection of embellishments! I focused mainly on some charms, small stamps and cute buttons, including a teeny, little pencil!


My 'forgeries' this month include a stack of Pocket Style Cards (all from my Printables board on My Pinterest) which have a 'Planner' or 'Goal' related theme, like these beautiful Planner Cards from Digital Design Essentials. I also included some home-made Planner Clips (e.g. buttons on bobby clips) and there will be a tutorial over on the Counterfeit Kit Challenge blog for Forgeries On The Fourth.

Although I'll be using a substantial selection of my kit for scrapbooking, I'll also be using quite a lot of it this month as I 'set up' in my Color Crush, so I hope that you'll pop back throughout the month to see how I'm using all of my little beauties!

Now, I'm excited to see which kits the rest of the team chose, so my next stop (and maybe yours?) will be Jemma at Just Jimjams!